# EFS
## ❊ What is EFS?
The **`Encrypting File System`** on Microsoft Windows is a feature introduced in version 3.0 of NTFS that provides filesystem-level encryption. The technology enables files to be transparently encrypted to protect confidential data from attackers with physical access to the computer.
## ❊ EFS vs Bitlocker
BitLocker helps protect an entire drive against offline attacks, whereas EFS can provide additional user-based file level encryption for security separation between multiple users of the same computer. EFS can also be used in Windows to encrypt files on other drives that aren't encrypted by BitLocker.
In short, **`BitLocker`** is full disk encryption, and **`EFS`** is individual file encryption.
## ❊ How It Works with Yubikey
Usually with Bitlocker, you unlock your drive once with your Yubikey / smart card and the drive stays unlocked until you lock it again or restart your computer.
EFS on the other hand is much more adamate about ensuring your files are only accessed by the correct people.
With EFS, you can specify the "cache" time between authentication requests. This means that when you attempt to access or open a file, you will immediately be prompted by your Yubikey to authenticate. After that successful authentication, the computer will "remember" you for a period of time and lets you continue using the file uninterrupted. However, after that cache period is over, you will be asked again to authenticate the next time you access the file.
The cache duration can be increased or even decreased to as little as asking you to authenticate every 5 minutes. Or you can make EFS remember you for the entire day once you authenticate successfully the first time.
## ❊ Configure EFS
Click  -> **`Run`** -> type **`gpedit.msc`**
You will need to navigate to the following location:
```
📃 Local Computer Policy
💻 Computer Configuration
📁 Windows Settings
🔒 Security Settings
📁 Public Key Policies
📁 Encrypting File System
```
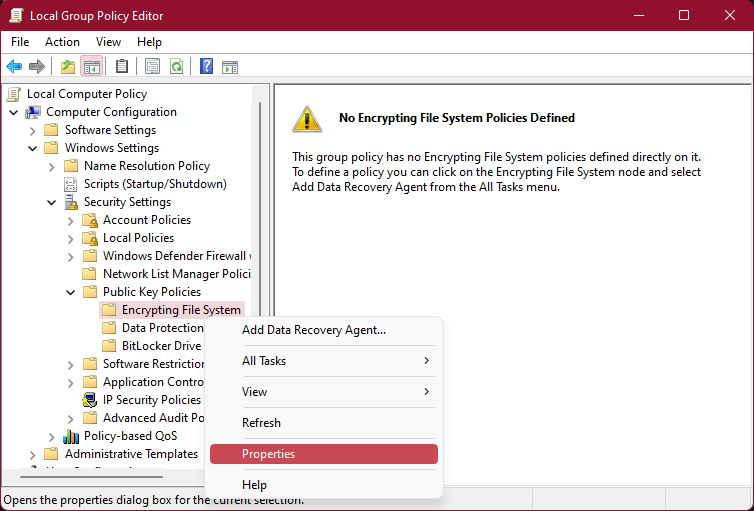
Once you locate **`Encrypting File System`**, right-click and select **`Properties`**:
You will see a new dialog with a few tabs and options:
The settings you select depend on your preferences. In our demo, we want a pretty locked down system, so we've selected the following:
* **`Require a smart card for EFS`**
* **`Display key backup notifications when user key is created or changed`**
Then select the **`Cache`** tab.
In this section, we're only going to allow it to cache the encryption key for **`120 minutes`** (2 hours).
You can set the cache timeout for as long or short as you want. The lower the time, the more it'll ask for authentication directly from your Yubikey.
Once you've configured the desired settings, click **`Apply`** and **`OK`**.
## ❊ Encrypting Files
The process of encrypting a few of your files is rather simple. Locate a file you wish to test with first, in case something happens or it is not configured properly, you won't lose anything valuable. Then once you have the process down and understand how ti works, you can then encrypt your valuable data.
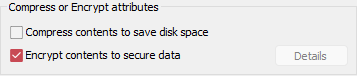
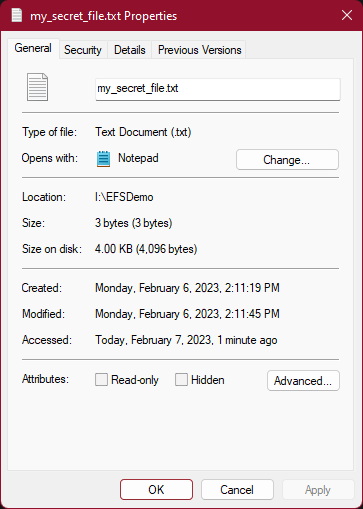
To encrypt, right -click on a file and select **`Properties`**.
At the bottom of the dialog box, select 
You will then see another dialog box appear:
Enable / check the option at the bottom **`Encrypt contents to secure data`**.
Once checked, press 
A dialog appear:
For this tutorial, we will select **`Encrypt the file only`**.
{% hint style="warning" %}
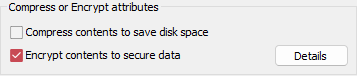
Once you press OK to encrypt the file, physically look at your Yubikey. If the "Y" is blinking, you will need to touch your device in order to complete the encryption process.
\
Touching your Yubikey will be a requirement each time you wish to access your encrypted file depending on how you've configured your PIV touch policies. You will not see a dialog appear on-screen telling you to touch the key, so you will need to physically pay attention to it and touch it if it blinks.
{% endhint %}
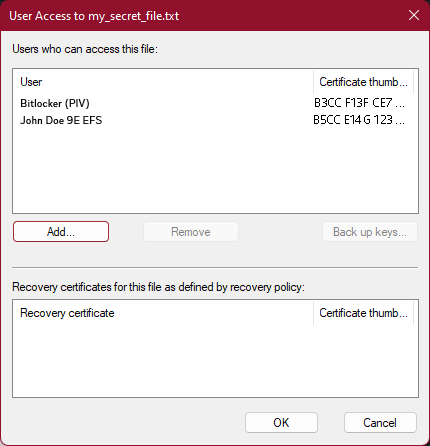
At this point, if you click the  button again and look at the checkbox to encrypt data, a new button should be enabled labeled 
The  dialog should display certificates that are able to access this file.
If you do not see anything in this list, that is fine. Close out all the dialog boxes and return to the file you were encrypting.
Depending on the file, you should now see a yellow lock integrated into the icon:
After you first enabled encryption for your file, that counts as one authentication. Which means your key is cached and you can freely access the file for a certain amount of time.
If you attempt to access the file and remove your Yubikey, a dialog box will appear:
Be sure to pay attention to the icons near your clock. If you attempt to access an encrypted file and it appears that your computer may have froze and is not responding, that is a graphical glitch in Windows. Somewhere near your clock should be an icon indicating that EFS requires you to enter your Yubikey or type of your PIN.
If your Yubikey is not inserted into the USB port, you will see the following:
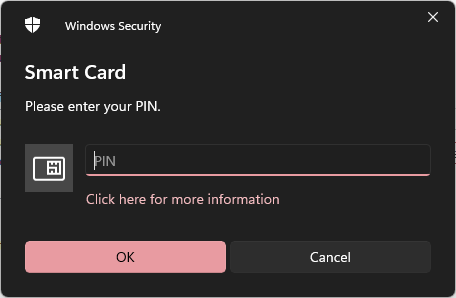
Once you enter your Yubikey, Windows will find your certificate and ask you to enter your PIN.
## ❊ EFS Certificate
EFS appears to prefer using the certificate that has been assigned to the user account via the Windows control panel.
To locate this area, click  -> type **`Control Panel`**.
Select **User Accounts** option:
On the next dialog, select **`Manage your file encryption certificates`**:
A dialog box will appear:
Select  to see the following:
You may not see any certificates in the box above.
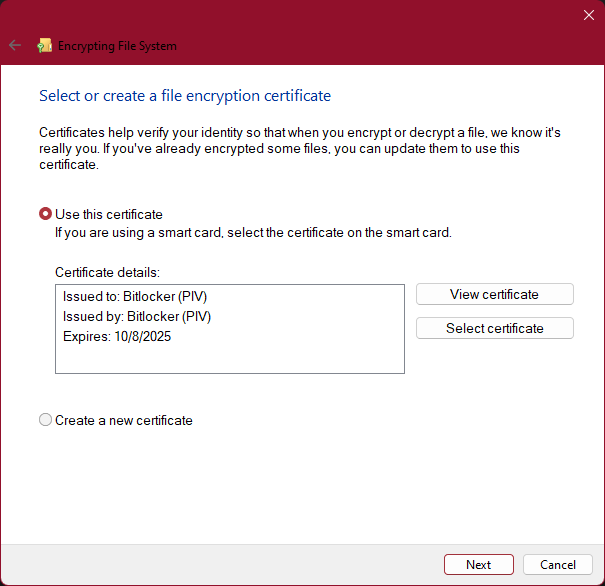
If not, then click  which should make a dialog appear which asks you to select the certificate you wish to use for EFS / Bitlocker.
Once you select the correct certificate, another box will appear asking you to enter your PIV PIN.
Once the PIN has been entered, you will see:
For the purposes of EFS, you can leave this alone and click  and yet another dialog will appear asking for your PIV PIN again.
Once entered, the final dialog will show a summary of your assigned certificate:
You can now close this window and your EFS certificate should be associated to your account.
When you now right-click on a file and select  you can then click on the  in the below window:
Selecting the option **`Encrypt contents to secure data`** will now use the certificate you selected earlier in order to access or edit the file.
{% hint style="info" %}
**Side Note:**
You may notice once you enable encryption on a particular file that any time you attempt to access it afterward will result in a very slight delay between selecting it and the action taking place. You'll also notice your Yubikey light will turn on. This is due to the computer reading your Yubikey each time you access the encrypted file.
{% endhint %}
## ❊ Adding Additional Certificates
On top of the primary certificate Windows will use for EFS, you can add secondary certificates which can access the same file.
This can be done by right-clicking on the file, select  and access the properties page:
Select  and then on the far right near the option to encrypt, select 
You will then see a dialog box which lists your current PIV certificate name, and an 
You will then go through the normal process of being prompted with a list of your compatible certificates and you'll be able to select another certificate which will have access to this file.
Once you've selected a new certificate, enter the PIV PIN, and then apply your changes.
You can now access the selected file with any Yubikey which has one of the two specified keys imported.
{% hint style="warning" %}
When accessing an encrypted file, be sure you physically check the Yubikey. If you have the **`touch policy enabled`**, you will see the light on the Yubikey blink and you will be required to actually touch the Yubikey in order to access the file; otherwise the system will just sit there and eventually time out with an access violation error.
{% endhint %}
## ❊ Notes to Consider
I've setup the EFS system with my Yubikey a few times, and I've noticed the process can seem very buggy.
At times it will seem like once you encrypt a file, it stays unlocked, while other files will ask you to enter your Yubikey PIN or Touch almost every time you interact with them.
Lucky for you, I've spent the time trying to figure out why.
In the first part of the instructions where you were asked to click  -> **Run** -> type **`gpedit.msc`**, you will a dialog box which includes settings for EFS:
If you enable these settings, and then encrypt a file, all the files you encrypt will take on these settings.
If you come back to the EFS settings later and modify **`File Encryption using Encrypting File System (EFS)`** and set it to **`Not Defined`** or **`Don't Allow`**, the settings you had before disabling EFS will still apply to the already encrypted files.
This means that if you decide to change your EFS settings later, you must decrypt all of your files. Then come back to the above EFS settings, change the settings, and then go back to re-encrypt your files if you've just modified something like the cache time. If you disable EFS, then there's no need to re-encrypt.
The other note to take into account, if you **`uncheck / disable`** the option **`Create caching-capable user key from smart card`**, then caching will be disabled completely. You will need to enter your Yubikey PIN / Touch the yubikey almost every time you interact with the encrypted file. This means that if you disable that feature, then the settings in the **`Cache`** tab will do nothing.
---
# Agent Instructions: Querying This Documentation
If you need additional information that is not directly available in this page, you can query the documentation dynamically by asking a question.
Perform an HTTP GET request on the current page URL with the `ask` query parameter:
```
GET https://yubico.gitbook.io/yubikey5/tutorials/efs.md?ask=
```
The question should be specific, self-contained, and written in natural language.
The response will contain a direct answer to the question and relevant excerpts and sources from the documentation.
Use this mechanism when the answer is not explicitly present in the current page, you need clarification or additional context, or you want to retrieve related documentation sections.